Overview
Overview
Flow diagram for VMWare Assessment
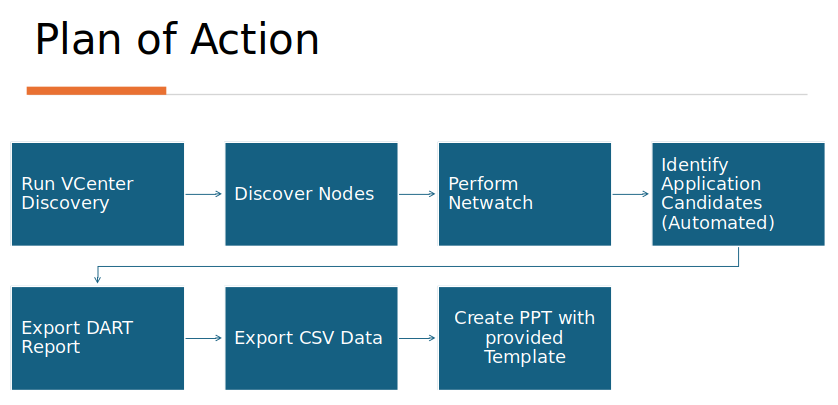
Let's have a look on each step of VMWare assesement.
Run VCenter Discovery
VCenter Discovery will help to identify running VMs and also identify the zombie hosts. It will also help to import csv for discovery.
Prerequisites for VCenter Discovery
- Access to Windows VM (Windows Server 2019 or Windows 11).
- Access credentials to VCenter[ReadOnly users]
- Download the below powershell scripts on VM
- VMware PowerCLI installed on windows VM
- Open PowerShell as Administrator
-
Run below commands in powershell
-
To Set SecurityProtocolType to TLS 1.2
-
To Install PowerCLI Module
- Select Yes to all prompts
- Note: Takes up to 10-15 mins to install
-
To Enable Connection to VMware Repositories
- Select Yes on the prompt
-
Steps to get host information
- Run the below powershell command. Modify the VCenterServerIP, vCenterUser, vCenterPassword and C:\Users\Administrator\Downloads\VCenterVMData.csv parameters as required
- Similar information as below will be captured for each VM
| Name | Host name | Powerstate | Num CPU | Memory GB | IP Address | Zombie | Provisioned Storage | Configured OS | avgCpu | avgMem | avgNet | Stop Date | Days Stopped | Comment |
|---|---|---|---|---|---|---|---|---|---|---|---|---|---|---|
- Utilize the VCenterVMData.csv as requested.
Steps to import host csv
- Run the below powershell command. Modify the VCenterServerIP, vCenterUser, vCenterPassword and C:\Users\Administrator\Downloads\VCenter_HostCSV.csv parameters as required
- Below Information will be captured for each VM
| Project | OS Type | Host IP Address | Alias | Username | Port | Connection Type | Vault |
|---|---|---|---|---|---|---|---|
- Utilize the VCenter_HostCSV.csv as requested
NOTE : If there occurs any issue, refer the troubleshoot section
Discover Nodes
- To know the details and concepts of Discover phase, visit the link.
- For prerequisistes depending upon the host machine operating system visit
- Multiple nodes can be imported via Adding multiple hosts using CSV file feature.
- Here we can use the VCenter_HostCSV.csv to add all the VCenter hosts.
- Re-verify the vaults are added in CHAI™. If not, refer the link to add vaults.
- As a standard practice it is recommended to divide hosts into projects depending on the environment/department and application.
- Environment-AppName (e.g.) Staging-Corp, uat-recas etc
- Department-AppName (e.g.) Sales-App1, Testing-App2 etc
- It is mandatory to ensure discovery of all nodes is completed before proceeding.
Perform Netwatch
- Netwatch collects information about the inbound and outbound network connections made to the host over a specified duration. Refer the below link for performing Netwatch.
- It is recommended to run Netwatch for 30 hours on VMs in batches of nodes.
Identify the Application Candidates
- Once the Discovery and Netwatch are completed successfully, CHAI™ helps to identify the potential applications.
- Also, to make report more tuned as per need, the Topology and customer workshop can be used to create/certify applications and fill in additional information like
- Business citicality
- Application owner
- Modernization goals etc.
Export DART Report
- DART Report means Discovery, Assessment and Rationalization Tool report. It can be exported by
- Click on DART Report
- Click on point 3 of Overview i.e Export DART report option.
- NOTE : Ensure Topology is generated before downloading the PDF
Export CSV Data
The csv can be downloaded for including all projects or single project.The csv can be downloaded using below link
The downloaded zip folder will contain the below listed csv
- applicationCandidates.csv
- applications.csv
- components.csv
- hosts.csv
- packages.csv
Create PPT with provided template
Modify the master excel to use the csv
- Get the master excel pivot_CH_Assessment_Workshop.csv and PPT Presentation-Pivot.pptx from CHAI™ team which can be modified as required.
- Open the master excel pivot_CH_Assessment_Workshop.csv
- Go to the hosts sheet present at the bottom tab.
- Open the downloaded hosts.csv, copy the whole data(CTRL+A) and paste it to the hosts sheet by usng (CTRL+A) in master excel.
- NOTE : Do remember to remove column headers of VCenter_HostCSV.csv before uploading it to CHAI™ portal for Discovery.
- Do similar for components, applicationCandidates and VCenterVMData sheets by replacing data with components.csv, applicationCandidates.csv and VCenterVMData.csv respectively.
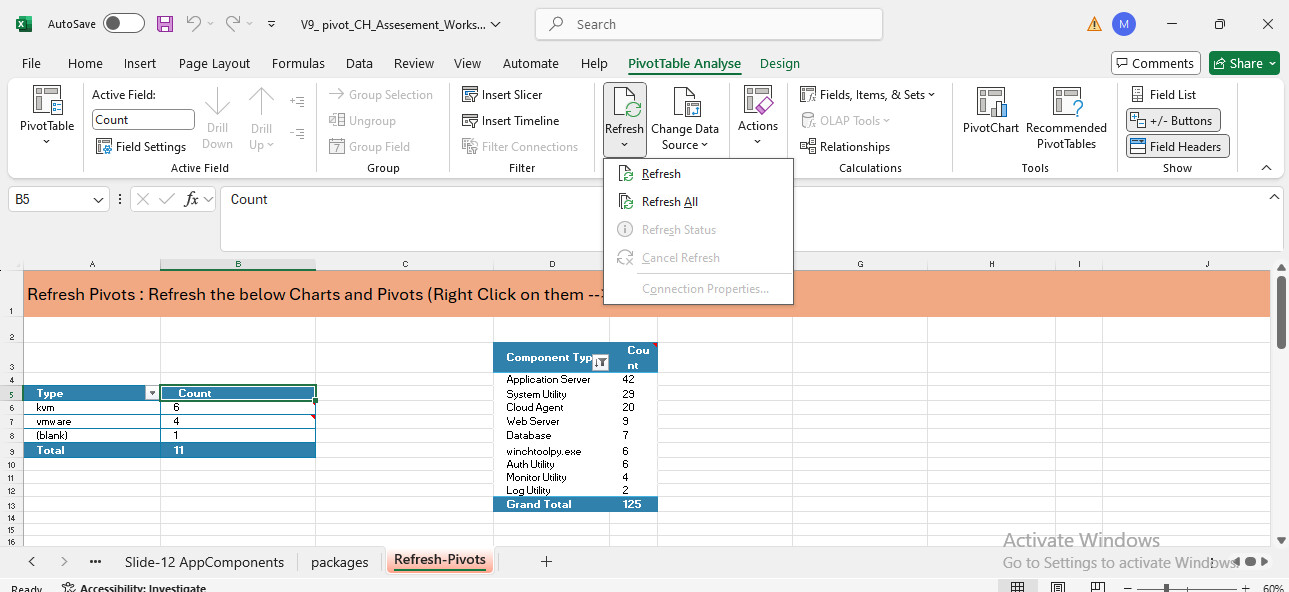
- Open the Refresh-Pivots sheet of master excel and go to the PivotTable Analyze tab on the top ribbon. Click Refresh, and then select Refresh All. . This will replicate and update the relatable values in all sheets of master excel.
- Go to the 'Slide-5 Classification' sheet. There is a Sanky-chart present which can be created as follows:
- Copy the data from the Slide-5 classification, which is present as shown in the image below.
- Open the link
- Clear the 'Inputs' field box and paste the copied data. (For reference and to understand the Sanky report, copy paste the sample data from sample file)
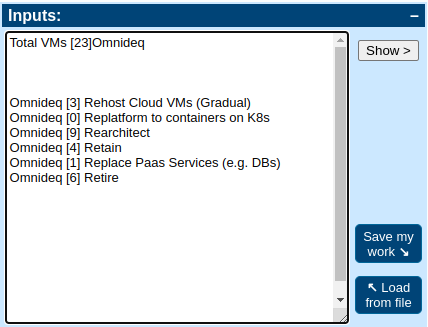
- The sanky chart will be created on the right side.
- This image can be downloaded by clicking on 'Download .SVG' button. This downloaded image can be used directly in PPT.
- There is no need to resize the data for pasting in PPT.
- Copy the data and do 'Paste special' as Keep Source formatting(K).
- The given data on PPT can be edited drectly afterwards.
- Need to replace the data manually on 'Slide-3 Executive Summary' as needed.
Troubleshooting
NOTE: To verify the version of PowerCli Module, run below command
Output: Version used to verify the scripts is: 13.3.0Error: Client20_ConnectivityServiceImpl_Reconnect_CertificateError OR Connect-VIServer. Error:Invalid server certificate. Use Set-PowerCLIConfiguration to set the value for the InvalidCertificateAction ....
Resolution: Run below powershell command before script execution
Error: Script is not digitally signed. users cannot run this script on the current system
Resolution: Run below powershell command before script execution
Error: The following commands are already available on this system:'Export-VM,Get-VM,Get-VMHost,Move-VM,New-VM,Remove-VM,Restart-VM,Set-VM,Set-VMHost,Start-VM,Stop-VM,Suspend-VM'. This module 'VMware.VimAutomation.Core' may override the existing commands. If you still want to install this module 'VMware.VimAutomation.Core', use -AllowClobber parameter.
Resolution: This error occurs if certain VMware utilities are already installed on the VM. It will be a good idea to override the old installation with latest version. Run below powershell command